.JPG)
Elec..JPG)
Tillikum gains Electricity.
A Proper Yacht these days has electrical power to operate its various expensive gadgets: bilge pumps, lights, depth sounder, radar etc.. I wanted Tillikum to be up to date as well and I was particularly interested in an automatic bilge pump. I imagined being in an emergency situation where the canoe was taking on water and I was too busy rowing or sailing for my life to stop to bail. It would also be nice to plug in a navigation light or even a VHF radio.
A Proper Yacht these days has electrical power to operate its various expensive gadgets: bilge pumps, lights, depth sounder, radar etc.. I wanted Tillikum to be up to date as well and I was particularly interested in an automatic bilge pump. I imagined being in an emergency situation where the canoe was taking on water and I was too busy rowing or sailing for my life to stop to bail. It would also be nice to plug in a navigation light or even a VHF radio.
bilge.JPG)
The perennial problem was weight, but I found a small gel cell 12v. 7.5 amp. hr. battery that would fit through the hatch in the rear flotation compartment. I glued a plywood base for it to rest on into the bottom of the compartment with a bungee cord to keep it in place even in an upset. Wires from the battery (fused) lead through the bulkhead (sealed with marine silicone) to an automatic bilge switch and 500 gph. bilge pump set at the rear of the slot that forms the keel. A second set of wires and fuse serve a waterproof socket into which I can plug a variety of lights and a flexible solar panel for recharging. Anything else, like a GPS map plotter or cell phone can run on their own batteries.
.JPG)
Tillikum goes to Sea.
Late summer is a busy time around our house for my wife Heather, with a whole big vegetable garden to be processed into winter stores. There is no time to go gadding about with her husband in his latest toy, so when our friends Tom and Charlotte dropped in for a rest from their long Kayaking trip through the Gulf Islands it seemed a good time to take Tom back out to sea so I could try Tillikum out in salt water. We trailered Tillikum down to the head of Fulford Harbour and found the tide was out - way out! Having checked the tide tables, we were expecting this and it was the perfect opportunity to try out the carriage for the long walk over the sand to the water. The new wheels worked well on the hard sand and soon I was rowing out the bay somewhat disappointed not to find the canoe slipping along like greased lightning. She was no faster than my dory, but then, Edith is particularly fast.
Late summer is a busy time around our house for my wife Heather, with a whole big vegetable garden to be processed into winter stores. There is no time to go gadding about with her husband in his latest toy, so when our friends Tom and Charlotte dropped in for a rest from their long Kayaking trip through the Gulf Islands it seemed a good time to take Tom back out to sea so I could try Tillikum out in salt water. We trailered Tillikum down to the head of Fulford Harbour and found the tide was out - way out! Having checked the tide tables, we were expecting this and it was the perfect opportunity to try out the carriage for the long walk over the sand to the water. The new wheels worked well on the hard sand and soon I was rowing out the bay somewhat disappointed not to find the canoe slipping along like greased lightning. She was no faster than my dory, but then, Edith is particularly fast.
.JPG)
An hour later and three miles from our launch site we went ashore at an island park for a walk and then I rigged the masts and sails and got Tom to take pictures as I sailed around in a light breeze. This time Tillikum tacked with no problems and sailed to windward well. With Tom back aboard we ran back up the harbour again in the light breeze. Running is the slowest point of sail but even so we only took another hour before we were beaching the canoe again and rolling it up to and on the trailer. Altogether a satisfactory sea trial.
carriage2.JPG)
+Til.+Carriage+(2).jpg)
carriage.JPG)
.JPG)
.JPG)
.JPG)
.JPG)
.JPG)
.JPG)
.JPG)
.JPG)
.JPG)
.JPG)
.JPG)
.JPG)
.JPG)
make+sails.JPG)
rig+sails.JPG)
rudder.jpg)
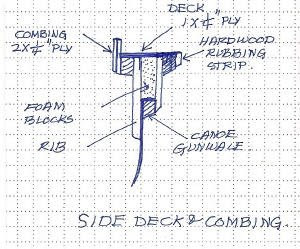side+decks.jpg)
.JPG)
decks.JPG)
decks.JPG)
BUS.jpg)

CB.JPG)
CB.jpg)
.JPG)

.JPG)
.JPG)
.JPG)
.JPG)
.jpg)
bl.crows.jpg)

crow.JPG)
voss.jpg)


