Tillikum

A canoe is a very small yacht. That is the assumption that the rebuilding of TILLIKUM is based on and the premise that will be behind the future adventures of this three masted ship that carries a famous name. Like this one, the original Tilikum was a three masted modified sailing canoe. We hope to follow in her footsteps, if not across great oceans, then across great continents.

Friday, May 23, 2008

Side Decks.


I removed the final clamps from the newly raised sides with some satisfaction and imagined how the canoe would handle under oars and sail: not very well it told me. The sides were fragile and would be too easily submerged when the canoe heeled under sail. I knew all about this because sailing my dory involved keeping a delicate balance between letting her sail on her chine, which she preferred, and having water pour over the gunwales. For an expedition boat I needed a more stable platform: I needed side decks. These would also give rigidity to the sides and add more buoyancy if the canoe heeled right down. It is so satisfying when a solution to one problem solves others as well.


By attaching another full length cedar strip to the inside of the ribs terminating in the Vs of the bow and stern I created a narrow surface to which I could glue curved strips of quarter inch plywood. A bow cambered deck flowed naturally from these plans and I needed to solve how the stern would develop as well: a small triangular hatch fitted well into this section: a perfect place for an anchor rode, as the canoe could just as easily be anchored from the stern as from the bow - easier in fact, because with masts and camping gear in the way it would be difficult to reach the bows.

Tillikum from the stern

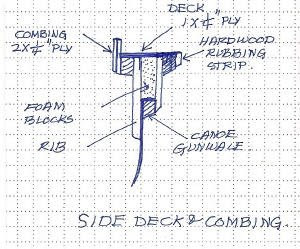
Before fitting and gluing the deck pieces, I cut small blocks of foam insulation and placed them on the inside of the raised side decks to augment the flotation (First coating the wooden surfaces with a thinned epoxy to seal them from moisture) if the canoe should be completely swamped. Then the bow and stern decks were glued into place followed piece by piece by the side decks. All pieces were cut oversize and trimmed to fit later. I used copper brads to hold the plywood into place until the epoxy had set. To protect the side/deck edge, I glued a hardwood strip that tapered toward the ends. This widened the sides another inch! I was step by step creating a ledge under which I could place another section of foam flotation.

The blocks of foam flotation.

I had been looking at photos of the sailing canoes of a hundred years ago that were also partially decked in and decided to build a combing along the inside edge of the deck. This would catch water running down the decks, provide a lip to which a spray cover or tent could be snapped and create more freeboard in case of a knock down.

The bow. Applying decks one piece at a time. Oversize, and then trim to fit.

This combing required some pretty tight curves,especially at the bow, so I glued it on in two stages; of quarter inch plywood strips laminated one to the other. Really tight curves were created on the wood-stove top with wet plywood held to the hot metal and bent into a curve amidst steam and smoke. They were then temporarily clamped into their final positions until dry when they would hold their shape while being glued and clamped. An epoxy fillet to fill the angle between deck and combing strengthened the joint. After planing and belt-sanding all to perfection I coated all with a thinned (with ten percent lacquer thinner) epoxy mix that could soak right into the wood.

*This project went ahead in small steps because I only had a limited number of C clamps and spring clamps. It would have been a perfect project for someone who only had a few minutes each day after work to build, but had weeks and weeks to complete it. For me, it meant that I had plenty of time to doodle ideas for the next stages in my sketch book and research in boatbuilding books. Then there were the middle of the night awakenings to find I had solved another problem in my dreams!

Tuesday, May 20, 2008

Playing House. - Raising the Sides.


Here I admit right away that I like to plan in conjunction with the canoe rather than first thinking it all out in my head. I interact. Once the replacement gunwales had been sprung and glued into place, holes patched with epoxy and fiberglass, and a midships bulkhead and centerboard case installed, I cut the carrying yoke out, as it would be in the way of the central rowing position. Now I could step into the hull and sit on a temporary seat and start creating a set of measurements around my body. How high must the seat be for a comfortable rowing position? If the seat is here, how high does the oarlock position need to be for rowing, how far aft of the seat and how far apart? If I want to sleep on board, (and I thought that was important), can I be comfortable in the six feet between the central bulkhead and the stern flotation compartment.? Fortunately, I was all alone in my studio so I did not have to worry about how others might view my playing house within this beat-up old canoe.


From all these measurements I could begin to formulate the first step of building up the sides. They needed to be higher by a few inches and wider. Like most canoes, this one had high raked up ends and a low freeboard amidships so it seemed reasonable to flatten the sheer line by raising the sides in the center and tapering them off into the ends. A big concern was to keep things as light as possible so I used some " mahogany"quarter inch plywood. The obvious way to raise the sides to give height and width was to use the outside of the gunwales as a base and attach short ribs to the inside at intervals to support them. I then ripped the plywood into long thin strips and clamped one side up to see how they would have to be cut to shape and scarf jointed. Once again you will notice that I`m holding parts up to the canoe and taking measurements while at the same time figuring out how to do it. It`s a co-operative process: the parts are informing me how best to proceed.


I have my own rough cedar lumber and plenty of scrap pieces of wood so the materials at hand guided my decisions as well. Because red cedar is light and could be cut in long thin strips, I found it made sense to use it to spring a strip from bow to stern on either side to create a smooth new sheer line and gunwale edge. But first, the plywood strip scarf joints were created with a belt sander, glued together and then they were clamped and glued to the gunwale. Finally the new upper gunwale pieces were bent into the shape of the new sheer line and glued to the outside edge of the plywood sides.( This also gained an extra two inches of beam.) That`s much the best way to go especially with this by guess and by golly style of boat building. I`s all very precise in the end, you just have to get your mind turned around in the right direction.


In terms of innovation in this phase of the building, placing the new gunwale strip on the outside rather on the inside was unusual. It just grew out of the process and invented itself. If I had planned this in advance, I`m sure I would have followed standard boat building practice and attached the new gunwale strip to the ribs first and then applied the plywood to the outside (and lost two inches of width). This may seem a picky point, but I would guess that discoveries often have their birth in semi structured environments like this. There`s nothing quite like messing about while building boats!


* I read John Gardner`s book Building Classic Small Craft and Wooden Boat Magazine for reference throughout this project. No harm in using the accumulated experience of many people, and the ability to read print and images for information and create syntheses is part of the skill set I brought to this project.

Tuesday, May 13, 2008

Casting Loose.


Deciding to build a centerboard case into the old canoe was a case of opting to follow the dream rather than settle for a simple fix.. It was the fatal step beyond which I would continue to work to bring the canoe forward out of the dark and into the light of realization. I put it off for days and finally attacked it in a tentative and harassed sort of way. When the call comes, the builder is often reluctant to accept.

The obvious place for the centerboard was between the midships bulkhead ( itself necessary because I needed to place some lateral support here as I was going to remove the carrying yoke that had served that purpose) and the front seat. I also wanted to place the main mast just aft of the front seat rather than through the middle of it because I needed a full time functional seat for a second member of the crew and as a second rowing station. The canoe has a narrow slot down the centerline and that would serve for the mast step and the slot that the centerboard case would be glued into.
The case was glued up (I used West System epoxy with a variety of fillers throughout the project.) from two side pieces of half inch plywood ( previously coated on the inside faces with epoxy/graphite) and two three-quarter inch wide end pieces that projected slightly below so they would reach to the bottom of the slot. I then fiberglass wrapped the ends of the box to give strength and make it leak proof. To fit the box tightly into the slot , I planed the bottom edges and trial fitted until it was a tight fit. I mixed up a batch of thickened epoxy, and set the case down into the bed of epoxy and at the same time glued it vertically to the central bulkhead. Having fastened this into place with temporary screws (drywall screws work great for this) I placed two lengthwise support pieces on either side of the case against the bottom of the canoe and bent and clamped them into place with props sprung down from a beam overhead.


This all sounds ploddingly workmanlike, but words cannot describe the frenzy when the epoxy is mixed and pieces are being fitted into place. The final wild moment came when I realized that those two side logs had to be sprung into place into the about- to- cure epoxy and I had no way to clamp them. I unsuccessfully tried bricks as weights and then remembering how dorys are traditionally made with the bottom pressed into a curved rocker shape by props wedged down from an overhead beam. That saved the day.
For those who might think that I should have thought of this in advance, I can only reply that too much thinking in advance is dull, dull, dull and that while I may not gamble in Las Vegas or ski straight down precipitous slopes I do indulge in free-for-alls like this. Ah, how satisfying!


The final stage was cutting the hole through from the bottom of the canoe into the centerboard case. The messy bottom joint was exposed and had to be filed smooth, gaps filled, and fiberglass cloth folded in to make a strong leakproof joint between hull and case. To support the sides of the newly cut hole I glued hardwood strips and faired them into the keel. All this took a lot of time and fiddle and gobbled up a lot of epoxy.


By the time I completed the case, I was fully launched and happy. Things just moved ahead from there and the difficult start-up phase was passed successfully. Casting loose from the shore is the most difficult part of any journey.


Black Bottom.
A book on wooden kayak construction described the process of coating the bottom in a coat of epoxy mixed with graphite to give a hard, slippery surface. I copied this idea for Tillikum. I had used this mix on my dory to harden the high abrasion parts of the bottom to good effect, and needed to thicken up worn areas where the canoe had been run up on beaches. Once these parts had been toughened up, I painted on a single layer over the whole bottom. It will be much more likely now to withstand the wear and tear of ocean and river travel.


Centerboard rather than dagger board.
The canoe must be able to adjust instantly to very shallow water. A daggerboard must be lifted in advance of shallows or it will break or at least stop the canoe while a centerboard will simply slide back up into the case as it touches ground and then drop again when the depth increases. I also designed a rudder that would do the same. More on this subject later.


Sail plan.
Establishing the position of the centerboard and to some extent the rudder influenced the future positions of the mast(s) and sail(s) as the center of lateral resistance of the hull was now established. Each modification called up further ramifications and this I found very interesting. I do not play chess, but imagine the ability to visualize how each move fits into the whole game is part of the satisfaction. As an artist too, I am used to developing an image within an ever shifting set of parameters and bringing all (hopefully) to a harmonious outcome. Something I bring to boat building that is strictly my own, is my artist`s pleasure in pushing the limits and inventing on the fly.

Monday, May 5, 2008

The Circle.


The first image of Tillikum surrounded by thoughts about turning dream into reality.

I started with crows even though this story purports to be about a canoe. Imagining begins well before the first design line is drawn and it is a step often skipped over in the rush to rational nuts and bolts planning. Can you imagine, what do you dream, are questions that access the creative and organizing parts of our mind. Crows were my dream guides for that important first imaging of a sailing canoe slipping along in the moonlight, still shrouded in darkness and mystery but on the way to take its part in the its developing design and construction.

Tillikum arrived first in the back pages of my sketchbook, a place I do my thumbnail sketches for all sorts of projects, and typically the first drawing was fairly complete, as though I had been given the whole before the parts and my job was simply to prove it out. I had dreamed for years of making a paddling canoe into a row boat: That long slim hull propelled by oars would be an interesting hybrid, and this drawing showed the raised and widened sides that would make this possible. Sails, I had already proven to work on another canoe journey and the gunwale flotation was an idea that worked well on my dory Edith. When a tent-like canopy idea surfaced I was on my way to adopting the camping/sailing model that we had used on our Wharram designed catamaran Amazon that we had sailed in the Bahamas. So perhaps the design roots of Tillikum were not that mysterious after all but the way all the design components gelled without conscious thought still fascinates me and I always give full room for its free operation.

Once the canoe is built, the final stage will be the fulfilment of the dream: the adventure into the unknown landscape, of new knowledge only revealed through experience. That step will be the culmination of the impulse that began the project and the closing of the circle where experience provides the matrix from which new ideas will spring.

The original Tilikum